Foam Rolling for Runners: 11 Techniques to Reduce Soreness & Prevent Injury

If you’re a runner, chances are you’ve felt tight muscles, stiff legs, or that “next-day soreness” after a run. Foam rolling is a simple way to release tension, improve blood flow, and help your body recover so you can stay consistent with your training — without feeling beat up all the time.
As a chiropractor who works with runners, one of the easiest recovery tools I recommend is foam rolling. It’s simple, inexpensive, and surprisingly effective when done correctly.
Think of foam rolling like a self-massage that you control. You decide how much pressure to apply, how long to stay on tight spots, and when to back off. Some areas may feel a little uncomfortable at first — but once your muscles loosen up, most runners notice their legs feel lighter and their stride smoother.
If you’re brand new to running, take a quick peek at these Tips for Beginner Runners — it’ll make everything below feel a lot easier.
And if soreness has already been a struggle, it’s worth checking out my full guide on recovery tips for runners to support your training alongside foam rolling.
Foam rolling works like a mini self-massage. It targets muscle knots and muscle tightness, helping your body respond better to training and reducing the risk of overuse injuries. And the best part? You don’t need to be a pro or a personal trainer to do it — just a foam roller and a few minutes.
Whether you’re dealing with muscle soreness, want a smoother stride, or just want running to feel easier, the techniques below will help you run looser, stronger, and with more confidence.
TL;DR – Quick Takeaways for Busy Runners
- Foam rolling for runners helps reduce soreness, improve mobility, and prevent injury.
- Focus on key areas: calves, quads, glutes, shins, and upper back.
- Roll slowly, breathe, avoid joints & bony areas, and spend 5–10 minutes total.
- Short on time? Foam rolling can “wake up” your muscles — but it doesn’t replace a real warm-up. Pair it with the 5-Minute Running Warm-Up for best results.
- Best times: before a run for activation, after a run for recovery.
Why Foam Rolling Matters for Runners
Most runners don’t realize how much tension builds up in their muscles until it slows them down. Foam rolling acts as self-myofascial release — a method to release muscle tension, improve blood flow, and help your muscles relax so they move better.
Here’s why foam rolling helps runners:
- Reduces muscle tightness and muscle soreness
- Improves blood flow and circulation to bring more oxygen to your body
- Helps prevent overuse injuries like shin splints and runner’s knee
- Supports a healthier post-run routine and faster recovery
- Helps your stride feel smoother and more comfortable
For even better recovery, check out these Muscle Recovery Tips after your runs.
How to Use a Foam Roller Properly (Beginner Basics)
Before we jump into the techniques, here’s what you need to know so foam rolling actually works:
- Start with smooth foam rollers if you’re new — textured ones can feel too intense at first.
- Roll slowly (about 1 inch per second) — fast rolling won’t give your muscles time to release.
- Use your body weight to control pressure (more weight = deeper release).
- When you find a tender spot, pause there for 15–20 seconds until the muscle relaxes.
- Avoid joints & bony areas — rolling directly on bone won’t help and usually feels terrible.
If you’re short on time, foam rolling can help activate muscles before a run. Just remember that a proper warm-up helps your body run better.
💡 Pro Tip: Foam rolling shouldn’t feel like a 30-minute chore. I always tell my patients: 5–10 minutes is enough to make a difference. Many runners quit because it can be uncomfortable (yes, it might feel like your muscles are arguing with you), and they think they “have to do it forever.” You don’t. Build a simple habit — short and consistent works best.
11 Foam Rolling Techniques for Runners
We’ll start with the lower body because that’s where runners take the most pounding. But don’t skip the upper body — your posture, breathing, and arm swing all affect how you run and how your body feels during and after training.
See also: Running Gear for Beginners (link here)
1. Calves (Tight Calf Muscle Relief)
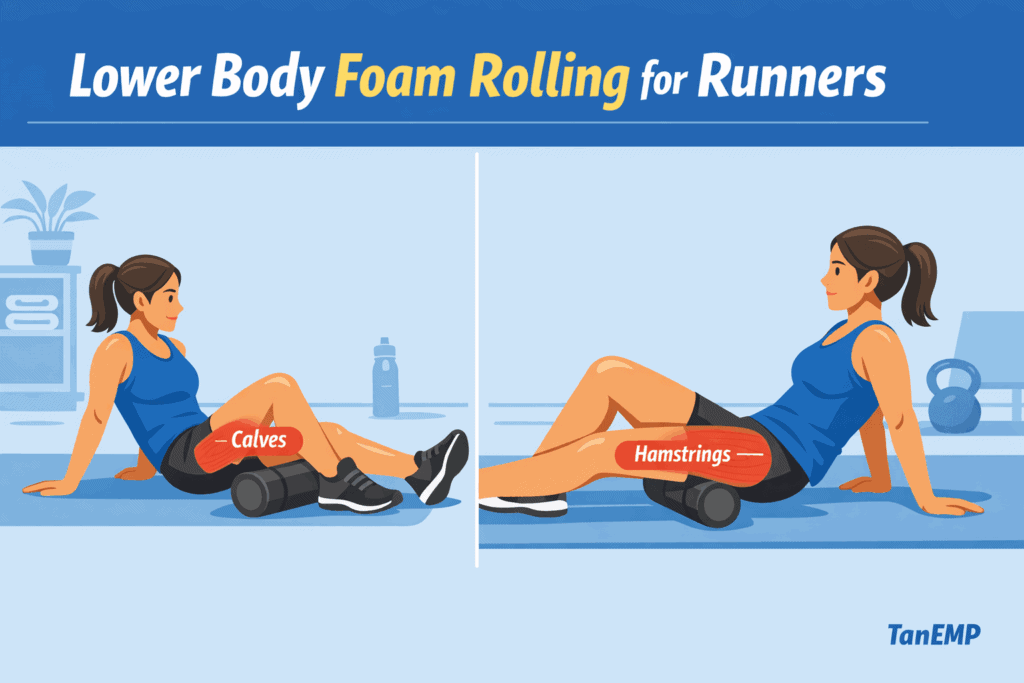
Tight calves are extremely common for runners — especially if you run hills, wear lower-drop shoes, or increase mileage. Foam rolling your calves can help reduce muscle soreness, improve blood flow, and take stress off the Achilles and lower leg.
How to do it:
- Sit with the roller underneath your calves.
- Roll from above your ankles to just below the knees.
- Cross one leg over the other for added pressure on tight areas.
Spend 30–60 seconds per calf, especially if your right leg or left leg feels tighter than the other.
2. Hamstrings (Loosen Tight Muscles for a Better Stride)
Tight hamstrings can limit your running stride and cause your lower back or knees to work harder. Loosening them helps your legs extend more naturally so running feels smoother.
How to do it:
- Sit with legs extended, roller under your thighs.
- Roll from the glute area down to just above the left knee or right knee.
- Pause on spots that feel extra tight.
Aim for 45–60 seconds total.
3. Quads (Post-Run Recovery Essential)
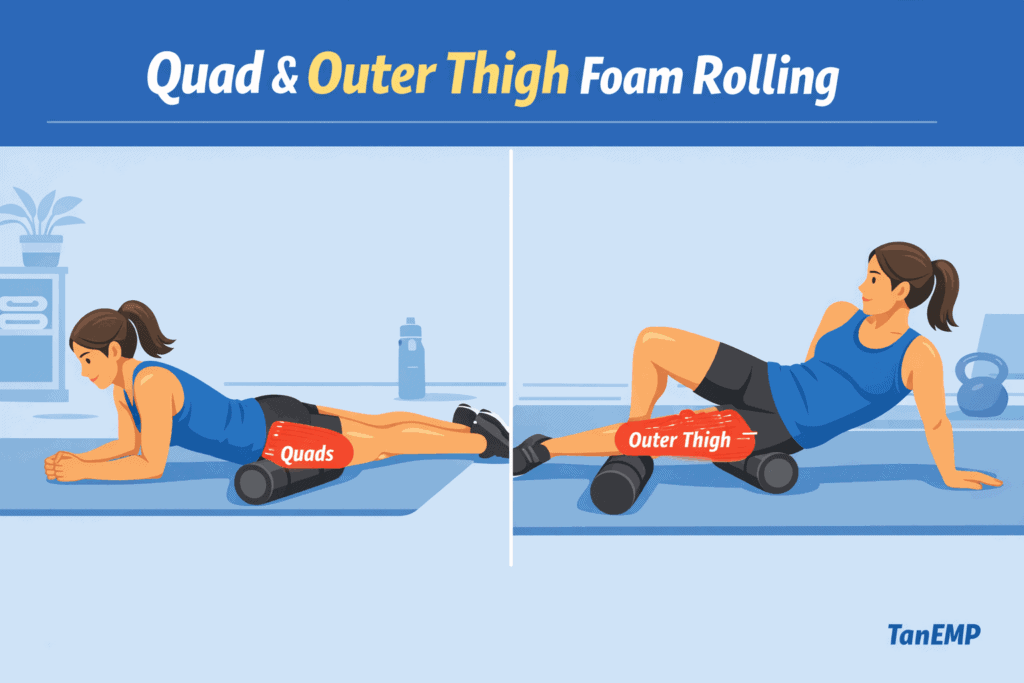
Your quads absorb a lot of impact when running — especially during downhills and speed work. This major muscle group often stiffens up after a hard workout, affecting knee comfort and running form.
How to do it:
- Lie face-down with the roller under the front of your thighs.
- Start by rolling from the groin to just above the knees a few times to warm up the tissue.
- Then shift more body weight into one leg to target one quad at a time (fair warning — this can feel intense!).
- Roll slowly and breathe through the discomfort.
💡 Pro Tip: Once you’re warmed up on one quad, you can slightly rotate your body outward to roll the quad + IT band “border zone,” and if you rotate a bit more, you can hit the hamstring-side border too. This gives you three key areas in one smooth roll — efficient and effective.
4. IT Band Support Zones (Outer Thigh Relief — Without Rolling the Band Itself)
Many runners try to foam roll the IT band directly — but here’s the truth:
The IT band is not a muscle. It’s a thick, tendon-like band, so rolling directly on it usually just hurts without fixing the problem. The real relief comes from releasing the muscles around it.
What to roll instead:
- The outer quad side
- The outer hamstring side
- The glute/TFL area (where the IT band starts)
Releasing tension in the outer thigh helps improve knee alignment and reduces that tight pulling that often shows up during or after runs.
See also: Improving your mechanics with Proper Running Form for Beginners.
5. Glutes & Piriformis (Hip Stability + Back Relief)
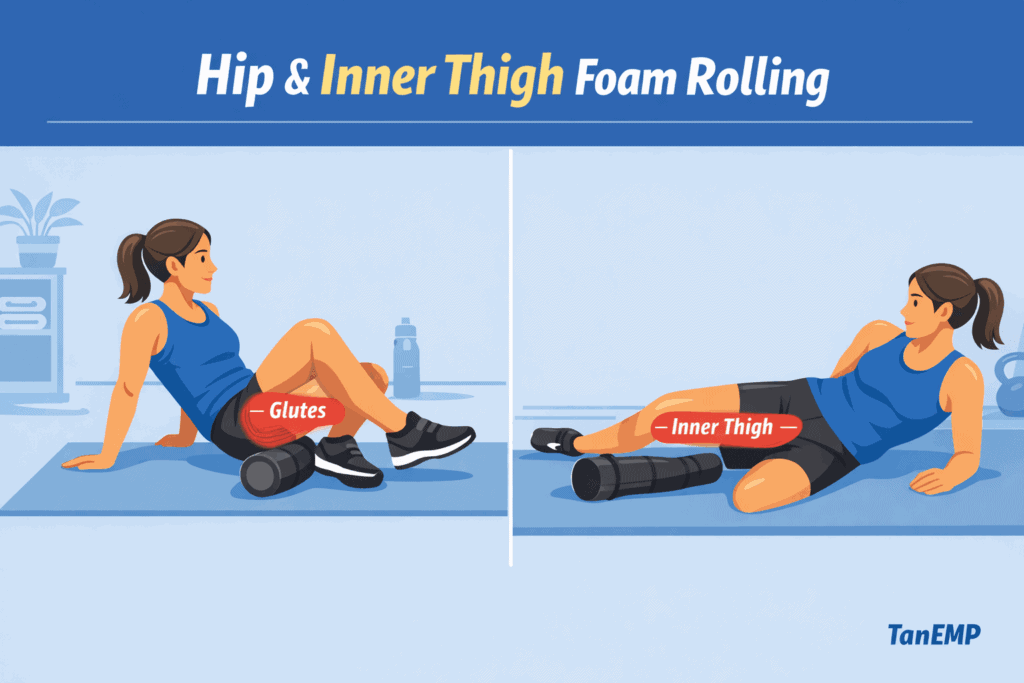
Tight glutes can cause issues up and down the chain — including hip discomfort, lower back tightness, and poor shock absorption. Releasing the glute muscle helps your hips move more freely.
How to do it:
- Sit on the roller and shift slightly to one side.
- Cross the ankle over the opposite knee to expose the glute.
- Roll small, controlled circles for 30–45 seconds.
Do each side individually (right glute and left glute) — one side is usually tighter.
If tight glutes affect your stride, improving your rhythm with Running Cadence for Beginners can also help your running feel smoother.
6. Adductors (Inner Thigh for Hip Balance & Knee Tracking)
Runners often overlook the inner thigh, yet this area plays a big role in how your knees track when you run. Tight adductors can pull your knees inward, affecting hip alignment, running form, and knee comfort.
How to do it:
- Lie face-down with one leg out to the side.
- Place the roller under the inner thigh.
- Roll from the groin toward the knee.
- Go slow — this area can be surprisingly tender.
Spend 30–45 seconds per side. If your knees tend to cave in during runs, make this part of your weekly routine.
7. Shins – Tibialis Anterior (Shin Splint Prevention)
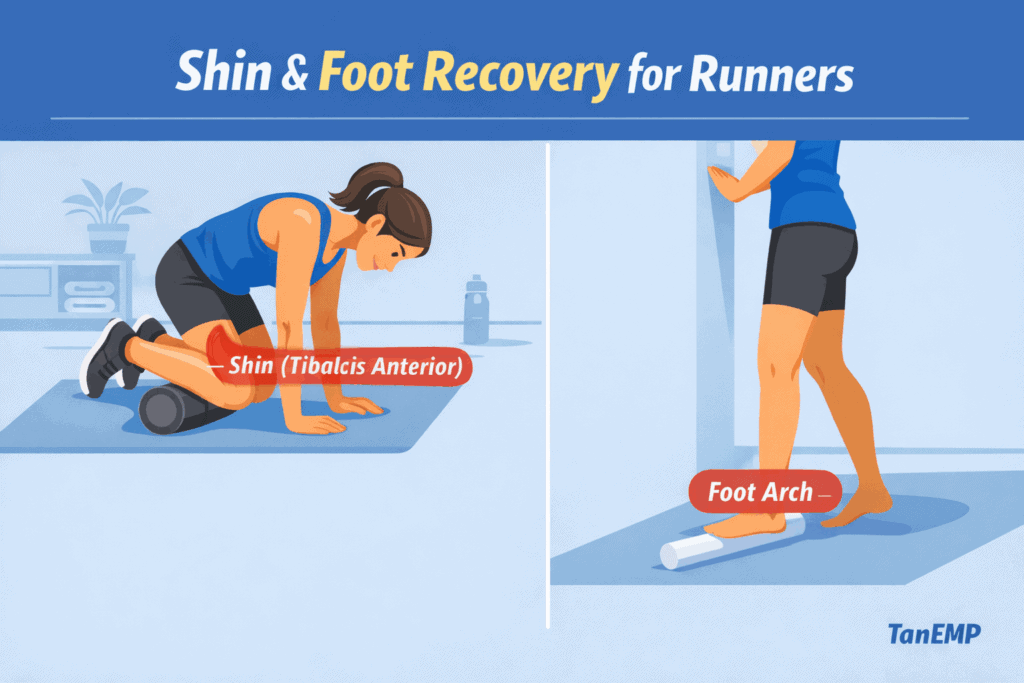
If you’ve ever dealt with shin splints, this one’s for you. Targeting the tibialis anterior (the muscle along the front of your lower leg) can help reduce that tight pulling feeling and prevent irritation from building up.
How to do it:
- Kneel with the roller under your lower leg, near the shin.
- Gently roll from just below the knee toward the ankle.
- Use light pressure — this muscle is sensitive.
Even 20–30 seconds can help relieve tension.
If shin splints hold you back, this guide on How to Run Longer can help you build mileage gradually without overloading your legs.
8. Feet & Arches (Better Foot Support & Running Form)
Your feet are your foundation when you run. Rolling them improves foot mobility, balance, and shock absorption — especially helpful if your feet feel stiff in the morning or after runs.
Where to roll (3 small zones):
- Arches: Releases tension in the plantar fascia.
- Sides of the Foot: Helps with stability and toe-off mechanics.
- Near the Heel Border: Roll the soft area in front of the heel pad (avoid the heel bone — not pleasant and not helpful).
How to do it:
- Use a small ball or foot roller stick.
- Gently roll each area for 20–30 seconds.
- You can do this seated or standing.
If your running form feels “off” due to foot mechanics, check out Running Gear for Beginners (link here) — the right shoes and gear make a difference too.
🔹 Upper Body (9–11) — Don’t Skip This!

Most beginners only roll their legs, but your upper body matters more than you realize. If your upper back and shoulder blades are stiff, it affects posture, breathing, arm swing, and rhythm — all key parts of efficient running.
Spending even 1–2 minutes here can improve your running posture and help your body stay relaxed during runs.
9. Lower Back & Mid Back (Gentle Mobility Only)
This isn’t about digging into the spine — it’s about gentle rolling to help release surrounding muscles and improve mobility. A stiff mid back can affect how your upper body rotates and how comfortably you run.
How to do it:
- Lie on your back with the roller under your mid back.
- Hug your arms across your chest to open up your shoulder blades.
- Roll gently up and down the mid to lower back (avoid rolling directly on the spine or low-back joints).
💡 Pro Tip: Never foam roll directly on your lower back or neck. These areas don’t have enough muscular protection, and pressure here can create irritation. Instead, target the muscles beside the spine (the erector spinae) to keep it safe and effective.
10. Upper Back / Shoulder Blades (Posture & Arm Swing Upgrade)
Upper back mobility often gets ignored by beginner runners because it doesn’t feel “running related.” But tightness here affects posture, breathing, rhythm, and how efficiently your arms move when you run.
Spending 1–2 minutes here can make your next run feel noticeably smoother.
How to do it (2 ways):
Horizontal Rolling (Classic):
- Roll across the shoulder blade area (mid-back to upper-back).
- Lean slightly to one side to target around the shoulder blades.
Vertical Rolling (Spine-Aligned):
- Place the roller vertically along your spine and gently lean side-to-side.
- This opens your chest, improves posture, and releases tension in the upper back.
To intensify either version, cross your arms gently to pull the shoulder blades apart so the roller can get into those tight spots.
✅ Note: The thoracic spine (upper back) is safe to roll because it’s supported by the rib cage and muscular layers. It doesn’t have the same precautions as the lower back and neck.
11. Lats & Chest/Shoulder Opener (Better Breathing & Form)
When your upper body is tight, your breathing becomes shallow, and your arms can feel stiff when running. This combo helps open up both the sides of your body and the front of your chest for easier breathing and smoother arm swing.
How to do it:
- For lats: Lie slightly on your side with the roller under your armpit area.
- Roll from ribs down to mid-torso.
- For chest: Use a ball or stand against a wall and gently “press and release” tight spots.
When Should Runners Foam Roll?
Here’s the simple rule:
Foam roll as often as you run.
- Run 2x a week? Foam roll at least 2x a week.
- Run 3–4x a week? Foam roll 3–4x a week.
Daily is great — but start with consistency, not perfection.
Don’t wait until you’re in pain to foam roll. That’s like only drinking water when you’re dehydrated — it works a lot better before things start hurting.
Best times to foam roll:
Timing | Why It Helps |
|---|---|
Before a run | Activates muscles and preps them for movement |
After a run | Releases built-up tension and supports recovery |
Rest days | Maintain mobility and reduce tightness |
If you want to improve your efficiency and running rhythm too, try Running Pace for Beginners.
Wrap Up
Foam rolling doesn’t need to be complicated or take forever. Start with 2–3 areas that feel tight and build from there. Consistency beats intensity — your muscles respond better to frequent, gentle rolling than once-a-week “deep torture sessions.”
Short on time? Foam rolling can be your “fast activation” tool — just remember it can’t replace a real warm-up. Pair it with the 5-Minute Running Warm-Up (link here) and you’ll feel the difference.
Think of foam rolling as simple body maintenance for runners: a few minutes today helps you run smoother, recover faster, and stay injury-resistant tomorrow.
FAQs
1. Is foam rolling before or after running better?
Both work — before a run helps activate muscles, after a run helps with recovery. If possible, do a little of each.
2. What are two areas you should avoid while foam rolling?
Avoid rolling directly over joints and bony areas — there’s no benefit and it usually just hurts.
3. Does foam rolling actually reduce muscle soreness?
Yes — when done consistently, it helps reduce muscle soreness, improve circulation, and release muscle tension that builds up from running.
4. Which foam roller is best for runners?
Beginners should start with smooth foam rollers. As you get used to it, you can try firmer or textured options for deeper release.
5. Should foam rolling hurt?
It may feel uncomfortable, especially on tight spots — but it shouldn’t be sharp or painful. Aim for a “good discomfort” level.